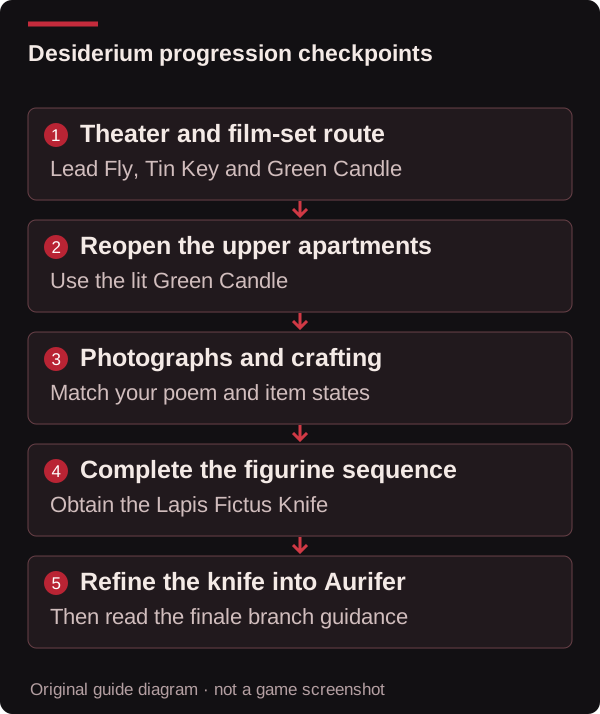
Tenebris Somnia Desiderium returns Julia to familiar places with changed objectives. Recover your belongings first, open the stair barriers, complete the apartment photograph and crafting chain, then refine the knife. This route connects those checkpoints to the finale entrance. It keeps the decisive ending choice inside a marked disclosure.
Tenebris Somnia Desiderium: starting requirements
Begin after the altered-school recovery: your belongings are back, the Apartment Key has been purified and the Red Candle has removed the first stair barrier. If you are still unarmed or carrying a Blue RCA Cable, finish that guide first. Familiar apartment numbers do not mean that the early Floor 2 TV puzzle applies again.
| Route segment | Required result before continuing |
|---|---|
| Altered theater | Lead Fly obtained after the floor-tile puzzle |
| Film-set route | Tin Key obtained; theater chest yields Green Candle |
| Upper apartments | Green Candle lights the way to Floors 2 and 3 |
| Apartment crafting | Heated mixture, photographs and both figurines completed |
| Initial knife | Auritsatio releases the Lapis Fictus Knife |
| Refinement | Electricity, mercury and moonlight yield Aurifer |
Theater tiles, Tin Key and Green Candle
Reveal the theater and film-set checkpoints
Go through Door A on Floor 1 toward the theater. From the community hall, take the left-side doorway and follow the path to the first fly statue. Break it when it has changed, then return to the hall and reproduce that room’s floor-tile path. The pattern varies between runs. Correct progress changes the fly statue; a wrong tile requires returning to the start. Follow your own preceding path instead of copying a universal tile diagram.
Once the remaining statue can be broken and the theater opens, take the Lead Fly from Julia’s seated statue. Use it at the matching fly-insignia door. Continue through the film-set encounters and complete the statue-protection sections; the Tin Key follows the final encounter. Use the key to return to the hall, then open the theater chest for the Green Candle.
Combine the candle with the Lighter and use it at the green stairwell symbol. This opens the upper apartment route. A key opening one door does not mean you have already collected the candle from its separate chest.
Prepare the two apartments and the crafting route
Reveal apartment preparation and mixture steps
- In Floor 2 Apartment B, interact with the bathroom faucet and the knife-holding Ivan statue. Collect the Glass Box in the bedroom and Photographs from the office clothes rack.
- Return to the stairwell and break the leaking cracked wall. The passage enters the bathroom from its other side; move the curtain to reach the kitchen and oven route.
- Go to Floor 3 Apartment B’s office. Collect the vase from the table. Into Indie Games describes Julia filling it with blood during collection; confirm that state before combining it with the Film Canisters. You need the vase containing chemicals and blood, not an assumed empty container.
- Complete the photograph puzzle described below. Then carry the prepared vase to the accessible Floor 2 oven, use it there and use the Lighter. Collect the resulting Circular Plate.
The vase is the late-area chemical container. It does not send you back to collect the opening game’s small Glass or use the original bedroom sunlight. Stop at a mismatched item state rather than adding an undocumented ingredient.
Read your photograph poem instead of copying one answer
Reveal the four poem variants and photograph order
At the Floor 3 office wall, read the poem and use the Photographs at the Roman-numeral panels. The opening line identifies the variant; fill panels I → IV using its row.
| Opening-line identifier | I | II | III | IV |
|---|---|---|---|---|
| He nestles in her hand | Hand with ring | Ear with earring | Shiny dress | Pearl necklace |
| You’re dead | Cross necklace | Feet | Sunglasses | Black veil |
| I’m dreaming | Mouth with lipstick | Sunglasses | Ear with earring | Black dress |
| Adorned with the blue of silver | Feet | Shiny dress | Closed eyes with long eyelashes | Black glove |
Use the visible subjects to identify the photographs; labels can differ slightly between written guides. Match your poem before placing them. Successful completion breaks the relevant displays and makes Julia’s figurine available downstairs.
Complete the figurines and obtain the base knife
Reveal the memento, studio light and Lapis Fictus route
Collect Julia’s figurine in the Floor 2 office and use the Circular Plate on the chest in that office for the VHS Tape. Take the tape to the Floor 3 television. During the encounter, enemies are visible through the screen, so use that view to locate them. Afterward, collect Ivan’s figurine and combine both figures with the Glass Box to complete the memento.
Return to the Floor 2 studio lobby through the blue door left of the elevator, then enter the A.S. studio. Apply the completed box/memento to the statue with the chest opening and break the changed statue. Continue left to the stage light; use the prepared vase there to obtain Auritsatio. Return to the Floor 2 knife-holding statue and apply it to obtain the Lapis Fictus Knife.
Refine the knife and reach the finale entrance
Use the Aurifer guide for the detailed final transformations: kitchen fuse box gives Melanosis, the mercury room gives Viridis, and the hotel route opened by the Lead Key supplies the moonlight transformation into Aurifer. Check each name before moving to the next station. Collecting the Lead Key is a separate checkpoint from transforming the knife in mercury.
Reveal the ending-sensitive choice and final approach
Save before attacking any Relicta with Aurifer. Killing at least one leads toward MAGNUM OPUS; avoiding those kills preserves SOLVE ET COAGULA. These conditions concern the late Relicta branch, not all mandatory fights earlier in the game. A save preceding the choice can support both main routes.
Return through the hotel to the studio lobby and apartment hallway. Take the stairwell to Floor 3, then the left-side doorway with leaking water to reach the street. Continue left toward Septimo Arte, the finale building. The ending overview explains the outcomes; hidden endings need their separate preparations and are not automatically completed by this route.
Recover from a blocked checkpoint
A sealed upper stair route calls for the lit Green Candle, not another fly-tile attempt. A locked office chest calls for the Circular Plate, not a VHS use at its lid. A missing Ivan figurine calls for completing the television encounter. A statue that rejects the box calls for both figurines. Work from the earliest missing result in that chain. Record the exact inventory name when reporting a mismatch.
Evidence and scope
This route is checked against the developer-linked official Steam puzzle guide and Into Indie Games’ Desiderium account, including the latter’s explicit blood-filled-vase transition. It is source verification, not an in-house playthrough. Exact installed build and console parity remain unconfirmed. The page connects the main puzzles through the finale entrance; it does not claim every pickup, hidden-ending prerequisite or a complete final-boss combat strategy.
Show the illustrated route (puzzle spoilers)
Sources & corrections
This guide is written from the sources below and reviewed for consistency. We do not claim a personal playtest. Source-check dates describe evidence review; the updated date above describes changes to this page.
Version scope: unknown — official puzzle-guide route checked 2026-10-24. Follow the stated full-game or demo scope; exact installed builds and platform parity are not assumed.
- Steam — developer-linked official Puzzle & Boss Guide ↗ — source checked 2026-10-24
- Into Indie Games — Desiderium and ending walkthrough ↗ — source checked 2026-10-24
Found a different result? Send a correction with the guide URL, game version and the affected step.