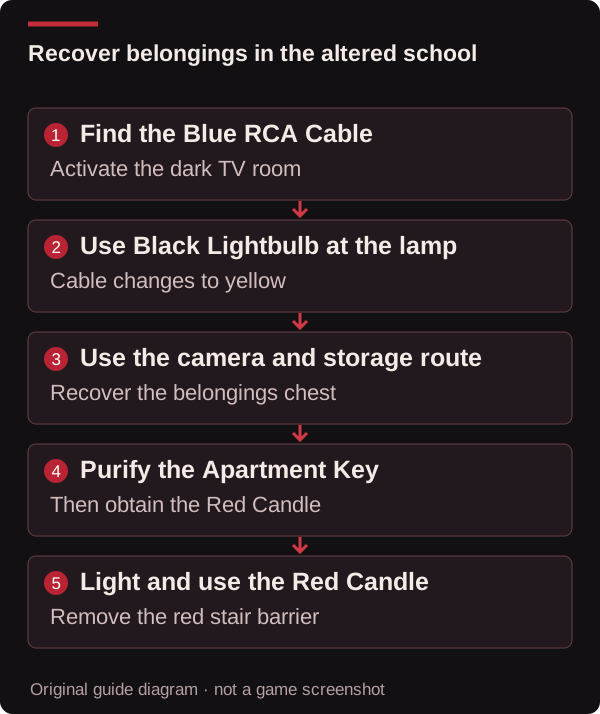
Julia’s missing belongings are recovered by linking the dark TV room, Black Lightbulb, camera and equipment chest in the altered film school. The colored RCA Cable is the bridge between those locations. This Tenebris Somnia school route starts in Desiderium after the inventory-loss transition; it is not the earlier ordinary-school camera puzzle.
Tenebris Somnia school route: identify the altered visit
Confirm that Julia has lost her usual equipment and still has the Apartment Key. If you are instead working with a Copper Seed, flowers or a Copper Key, you are on the earlier school visit. Those objects belong to another camera sequence. Do not search for the recovery chest’s route simply because both areas contain a camera and colored doors.
The objective here is to retrieve the belongings, purify the Apartment Key, obtain the Red Candle and use it to open the apartment stairwell barrier. The next chapter then resumes the changed theater and apartments. You can follow one checkpoint at a time without reading the ending conditions.
| Stage | Object or landmark | What you need to confirm |
|---|---|---|
| Beginning | Dark TV room | TVs can be activated to reveal the Blue RCA Cable |
| Color change | Photo-developing lamp | Black Lightbulb changes the world’s colors and the cable state |
| Access route | Film-production camera | Yellow RCA Cable reveals the rope route |
| Equipment recovery | Raised gate and chest | You can reach and open the belongings chest |
| Preparation to leave | Purified-water room | Apartment Key has been treated at the water |
| Exit objective | Julia statue, then apartment stairwell | Red Candle collected, lit and used at the red symbol |
Room landmarks are more reliable here than calling everything “the first floor.” Written sources describe the school’s levels differently. Use the stairwell, TV room, developing lamp and camera to match the actual room in front of you.
Restore the cable and reach the equipment chest
Reveal the school recovery steps
- Find the dark TV room and activate its televisions. Once you can see the room, collect the Blue RCA Cable from the table.
- Try the Blue RCA Cable at the film-production camera to establish that it needs the yellow version, then return to the hallway. The blue-door room opens along this route; enter and collect the Black Lightbulb. Avoid treating the newly appearing enemy as an encounter you must win while unarmed.
- Take the bulb to the photo-developing room. Use it at the lamp in the left corner. The color change turns the carried cable from blue to yellow.
- Return to the ground-level film-production/camera room. Use the Yellow RCA Cable at the camera, then interact with the rope that appears in the displayed set. This leads to the equipment-storage route.
- At the electrical gate, activate the left switch and wait for the gate to rise fully. Turn that switch off, then cross quickly and activate the right switch to reach the chest. The official guide emphasizes full elevation and disabling the current; Into Indie Games supplies this left-to-right switch sequence.
- Open the chest and recover Julia’s belongings. Check the actual inventory before moving on rather than assuming the rope interaction itself returned the equipment.
The cable must have the correct state at the camera. Repeating the camera interaction with a blue cable does not replace the lamp transformation. Likewise, entering the storage area and opening the chest are different checkpoints; do not leave after only seeing the equipment room.
Purify the key and recover the Red Candle
Reveal the key, candle and stairwell sequence
- Return to the school room that held the cursed film canister earlier. Break the glass obstruction and reach the purified water. Use the Apartment Key there.
- Return to the lower school room where the Black Lightbulb was collected. Its contents have changed: inspect Julia’s statue at the table to obtain the Red Candle.
- Combine the candle with the Lighter in the inventory to light it. Carrying an unlit candle is not the same state.
- Leave toward the apartment-building lobby. Use the doorway beside the elevator to enter the stairwell rather than expecting the ordinary elevator route to solve the barrier.
- At the red symbol blocking the stairs, use the lit Red Candle. Once the barrier clears, continue upward into the transformed building.
This is the handoff to the Desiderium walkthrough. Keep the colors tied to their purpose: the Black Lightbulb changes the cable state, while the Red Candle removes this particular stair barrier. They are not interchangeable darkness or lighting items.
Fix the first incomplete checkpoint
The camera rejects my cable. Read the cable’s color in the inventory. If it is still blue, return to the Black Lightbulb and developing-lamp step. If it is yellow, confirm that you are at the altered school’s production camera, not following the earlier flower-and-statue puzzle.
I reached storage but still lack my equipment. Locate and open the belongings chest. Access to the room is only the prerequisite to recovery. Check the switch state and gate crossing rather than returning to unrelated classrooms.
The statue has no Red Candle for me. Confirm that the Apartment Key purification step happened first. Visit the purified-water room with the key and inspect the changed statue room afterward. A remembered trip to the old canister room does not establish that the key was used at the water.
The stair barrier remains. Confirm three separate facts: you collected the Red Candle, combined it with the Lighter, and used the lit candle at the red symbol. Merely inspecting the symbol or carrying the candle is not the complete action.
Before leaving the school route
Your useful completion check is not “I have explored every classroom.” It is belongings recovered, key purified, candle used, red barrier removed. These are the dependencies that let the next route work. If one is missing, repair that checkpoint before climbing farther and diagnosing an unrelated apartment puzzle.
The item index separates transformations from item destinations. The puzzle hub helps when a particular interaction fails. If you are uncertain whether you are on the original school visit or its altered version, return to the walkthrough map and compare the last confirmed result rather than matching a room color alone.
Evidence, version and coverage
The route is source-checked against the developer-linked official Steam guide’s Desiderium – Film School section and Into Indie Games’ fourth walkthrough part. It has not been reproduced in an in-house playthrough, and no exact installed build or console parity is claimed. The guide covers the equipment-recovery visit through the red stair barrier, not every earlier film-school objective or every later ending. A persistent mismatch can be reported with the platform, location, cable state and first failed action.
Show the illustrated route (puzzle spoilers)
Sources & corrections
This guide is written from the sources below and reviewed for consistency. We do not claim a personal playtest. Source-check dates describe evidence review; the updated date above describes changes to this page.
Version scope: unknown — official puzzle-guide route checked 2026-10-24. Follow the stated full-game or demo scope; exact installed builds and platform parity are not assumed.
- Steam — developer-linked official Puzzle & Boss Guide ↗ — source checked 2026-10-24
- Into Indie Games — Desiderium and ending walkthrough ↗ — source checked 2026-10-24
Found a different result? Send a correction with the guide URL, game version and the affected step.